If you make a purchase using a shopping link on our site, we may earn a commission. Learn More
Comparing the Bambu Lab P1S and Ender 3 V3

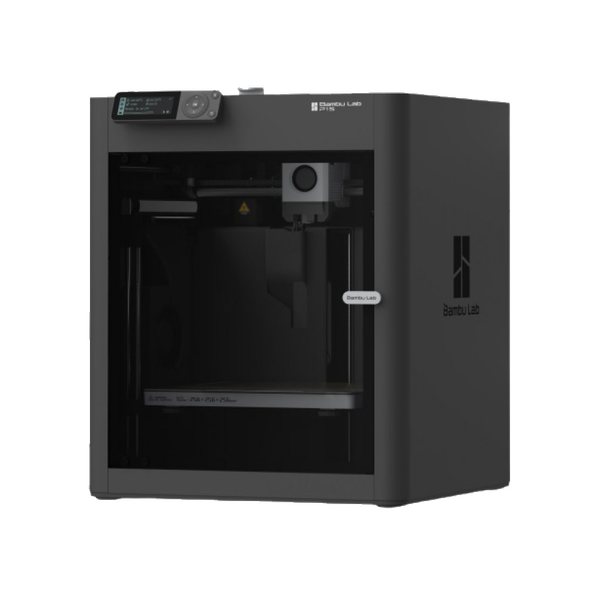
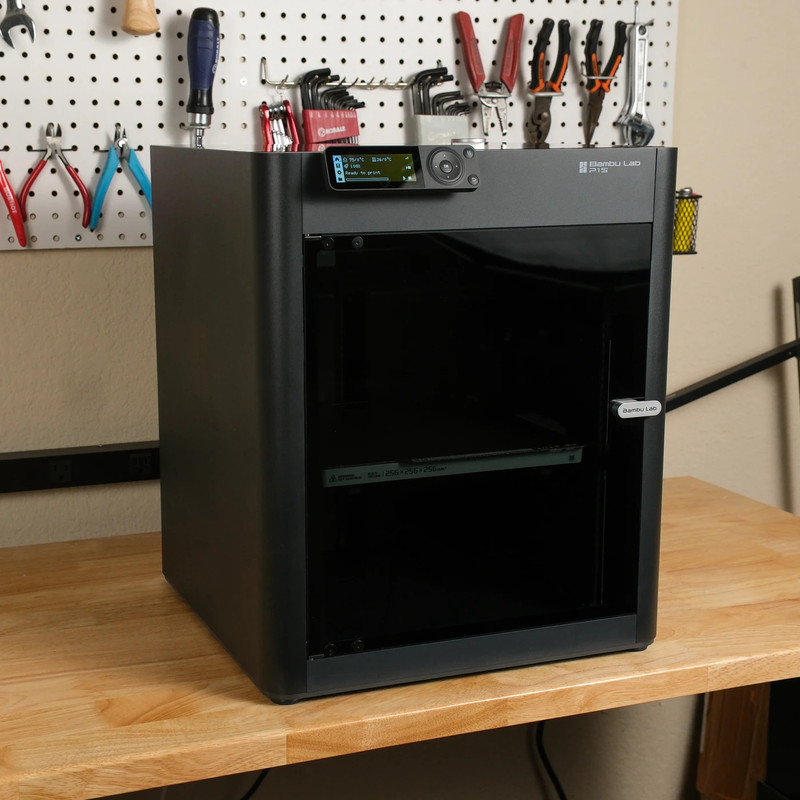
Bambu Lab P1S
(~10.25 x 10.25 x 10.25 in)
Vs.
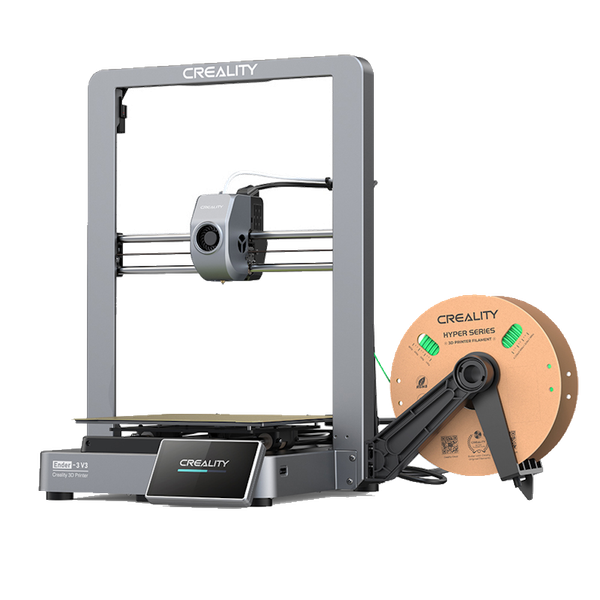
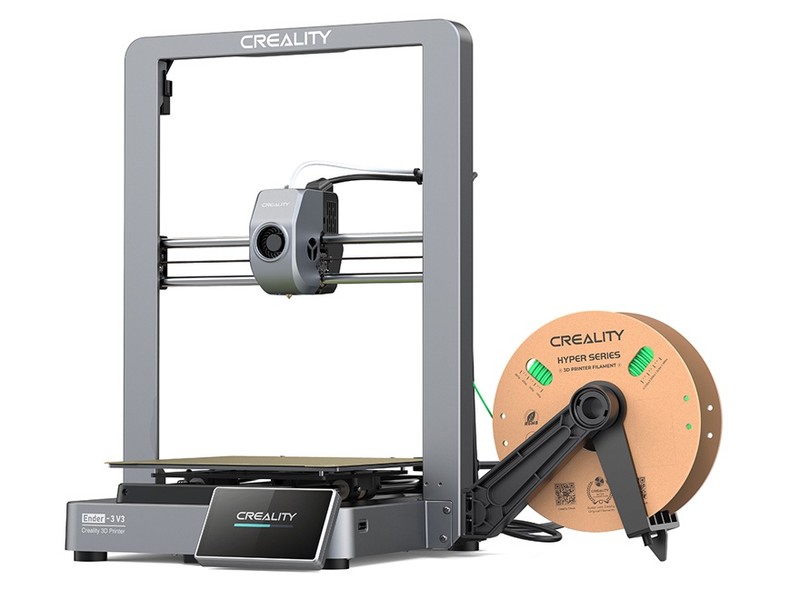
Creality Ender 3 V3
(~8.75 x 8.75 x 10 in)
In July 2023, the Bambu P1S was released as an upgraded version of the popular P1P. The P1S comes with many quality-of-life features that were missing on the P1P, including an enclosure and an additional part cooling fan, while retaining everything that we loved about the P1P.
Six months later, in January of 2024, Creality released their newest entry to the Ender 3 lineup with the Ender 3 V3 CoreXZ. This bedslinger imitates the high speeds found in the popular CoreXY printers by implementing a similar design for the X and Z axes.
In this article, we will be comparing the Bambu Lab P1S and the Creality Ender 3 V3 to see which 3D printer is right for you. We will be going over everything these printers have in common as well as the many differences they have in order to help you choose the right printer for your needs. Towards the end, you will find a complete breakdown of the specifications for both of these machines so you can compare them yourself.
Similarities Between the Bambu P1S and Ender 3 V3
Surprisingly, the P1S and V3 have quite a few similarities. Here are the most important features you will find on both 3D printers.
Extruder and Hotend
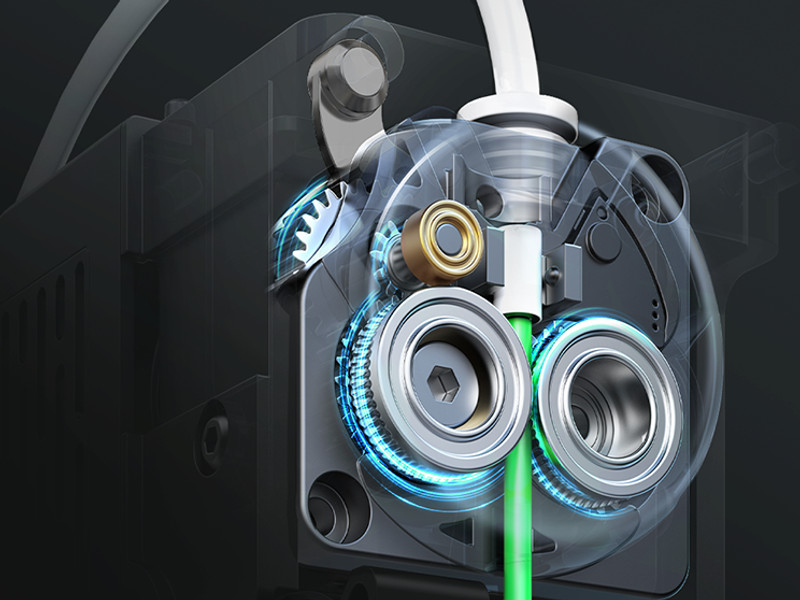
Both the P1S and V3 have a direct drive extruder mounted on the print head with a Bowden tube running along the cable chain for consistent filament feeding.
Both 3D printers use an all-metal hotend that is capable of achieving temperatures of 300℃. This means both machines are perfectly capable of printing all the common hobby-grade materials, while the P1S has a wider range of materials thanks to its enclosure.
Both printers rely on proprietary nozzles that are currently only available from their respective company’s site.
Print Surface
Both the P1S and V3 ship with a textured PEI print surface. Both build surfaces are flexible and magnetic, allowing you to quickly pop prints off of the bed once they cool down. Being easily removable, you can find aftermarket print surfaces that snap into place should you want a different texture on your build surface.

Connectivity
Both the P1S and V3 have WiFi connectivity options, allowing you to connect to your printer over your local network to send prints or make changes when needed. Both machines also communicate with their own proprietary cloud software, with the P1S using the Bambu Handy app and the V3 using the Creality Cloud app. These apps are used to slice existing models from a community library and send them to your printer.
Firmware
You will find a modified version of Klipper installed on both of these machines, giving them superior print speed and quality control settings that are quickly becoming the standard for any new 3D printer on the market. While the versions and available settings may differ slightly, you can more or less expect the same experience when using Klipper with these machines.
Auto Leveling
Much like the use of Klipper firmware, automatic leveling features are becoming a standard for mid-to-high-range 3D printers. You will find that both the P1S and V3 feature automatic bed leveling, automatic Z-offset calibration, and mesh bed leveling to make up for any inconsistencies found in your print surface. Both printers use strain gauges for accurate measurements during pre-print calibration.
Differences Between the Bambu P1S and Ender 3 V3
Now that we have covered the similarities between these two machines, let’s dive into the main differences.
Enclosure and Air Filter
An obvious difference between the P1S and the Ender 3 V3 is the inclusion of an enclosure on the P1S, giving it a more polished and appliance-like appearance over the V3. This enclosure allows you to print difficult filaments that require a consistent temperature while printing, such as ABS, ASA, and carbon fiber blends. To print these materials safely, the included air filter will intake any fumes produced during the printing process and filter them out before circulating the clean air back outside of the printer. The enclosure retains residual heat from the print bed to keep the chamber heated during printing. Should you want to print filaments that do not require a heated chamber, such as PLA or PETG, you have the option of removing the chamber cover to vent the heat.
Additionally, an enclosure makes your 3D printer safer to have around the house, keeping all of the heated and moving parts out of reach for pets or children.
The Ender 3 V3 uses an open-air frame design. This is ideal for printing filaments that do not require a heated chamber, as it provides natural cooling for the print. Attempting to print with ABS or ASA on the V3 will result in warping and prints lifting from the bed as they cool down too fast. We do not recommend attempting to use these filaments without an enclosure, doubly so without using an air filter for safety.
Build Volume and Size
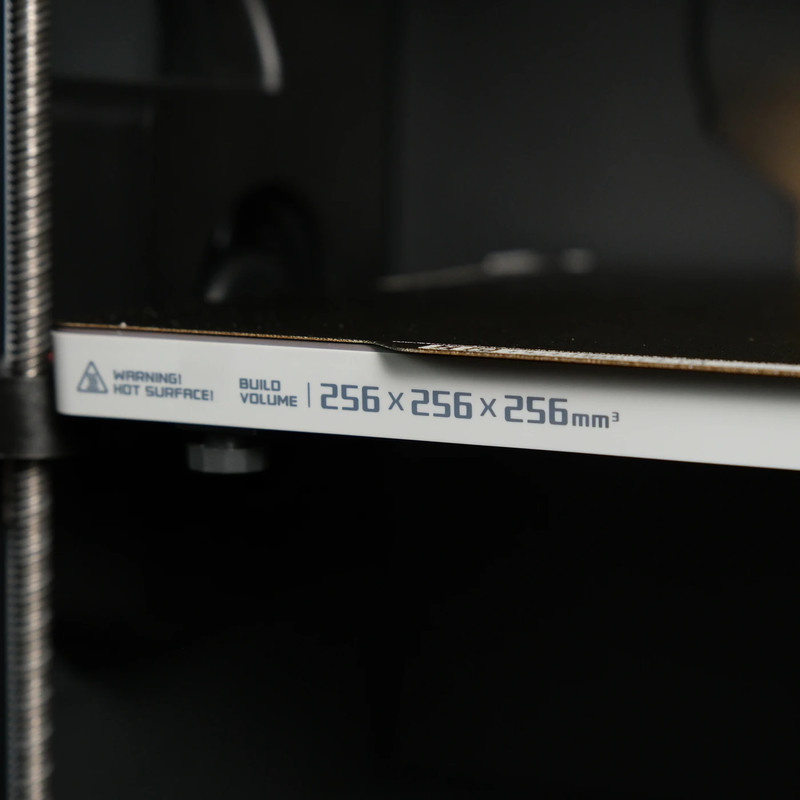
The P1S has a build volume of 256 x 256 x 256 mm (10” x 10” x 10”), which is slightly larger when compared to the average 3D printer. This build volume is housed inside the 386 x 389 x 458 mm (15.2” x 15.3” x 18”) frame of the P1S, which is surprisingly not much larger than the actual build volume.
The Ender 3 V3 has a build volume of 220 x 220 x 250 mm (8.75” x 8.75” x 10”), similar in size to the other V3 variants as well as the K1. The size of the V3 in total is 358 x 374 x 498 mm (14” x 14.3” x 19.6”), sitting at about a whole inch smaller in footprint than the P1S as well as almost two inches taller. It is important to note that the V3 will require additional space for the print bed to move freely. With this in mind, the P1S has a much more efficient use of its space.
You will be able to fit somewhat larger or multiple prints within the P1S build volume, while the Ender 3 V3 is still suitable for some smaller multi-part prints as well as most single-part prints. If build volume is a bigger factor for you, then the P1S is the clear choice here.
Cooling Fans
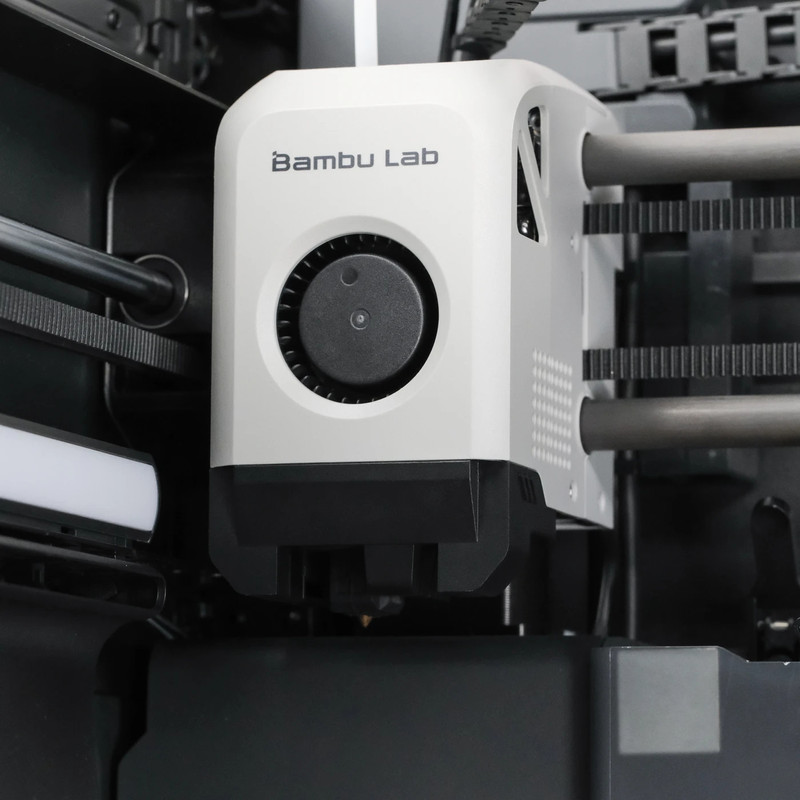
The P1S print head comes with two cooling fans installed, one for the hotend and one for part cooling. The part cooling fan shoots air through a duct that sends it toward the print from two separate angles to help improve overhangs. The P1S also comes with an auxiliary part cooling fan that mounts to the side of the enclosure and moves a massive amount of air toward the print to help cool down layers during high-speed printing, as these layers would normally not cool down fast enough before the nozzle runs back over them when it begins the next layer.
This auxiliary cooling fan helps to improve print quality at high-speed printing while also making steep overhangs much more manageable for the P1S.
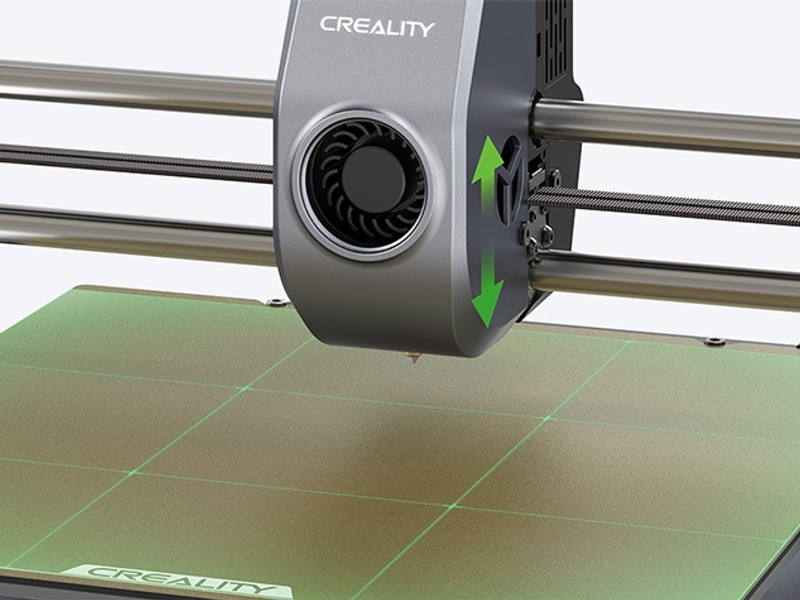
The Ender 3 V3 has three cooling fans inside of the print head, one for the hot end and two for part cooling. These fans are positioned on the front and back of the print head and work together to provide complete coverage around the nozzle during printing. This approach leads to better overhangs than most printers using a single fan on the print head.
The V3 lacks any sort of auxiliary cooling fan which will give the P1S an edge when it comes to printing smaller objects fast, as the layers may not have enough time to cool down on the V3.

Motion System
The P1S is a CoreXY 3D printer. It uses a combination of linear rods and timing belts to move the print head in the X and Y axes above the print bed. The Z-axis is controlled by two lead screws that move the bed further away from the print head whenever it is time to begin the next layer. This style of motion system was designed to give the print head as much maneuverability as possible while eliminating the need to move your prints along the Y-axis during printing, potentially causing issues with print quality.
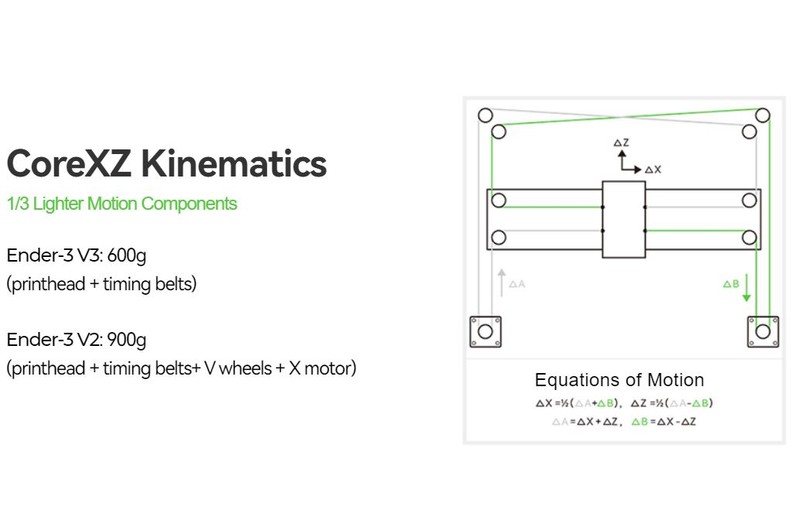
The Ender 3 V3 uses a unique CoreXZ design, using the same linear rods and timing belts found on the P1S. As the X and Z axes are paired together, both powered by two high-torque stepper motors at the base of the printer, the V3 is capable of achieving similar movements to the P1S. This is most notable in the X-axis, though the benefits made to the Z-axis seem negligible for this type of printer. Your prints are still moved along the Y-axis with your print bed. This can become a problem when printing tall prints without enough support to prevent them from falling over during fast Y-axis movements.
Overall, the CoreXY design still reigns supreme over bedslingers, at the cost of a larger machine footprint. The CoreXZ design of the V3 does offer some nice improvements, especially on the X-axis, though it still suffers from the same issues that plague every bedslinger printer.
Camera and Print Monitoring
The P1S comes with a built-in 720p camera that you can use to monitor your prints and check for potential failures from anywhere in your home using either the Bambu Studio PC app or the Bambu Handy phone app. While the FPS of this camera is very low, it does what you need it to do and is nice to have.

The Ender 3 V3 does not come with any sort of camera or print monitoring system. Creality offers an AI Camera accessory that you can purchase separately. It connects to your V3 using the USB slot and uses AI to monitor your prints and stops printing whenever a failure is detected.
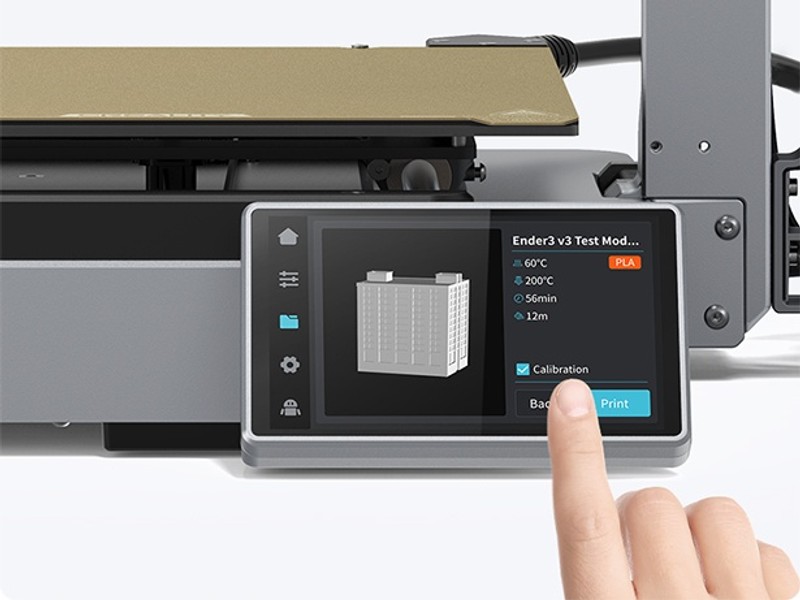
Display and Controls
The P1S comes with the same screen found on the P1P. It is a small display with a monochrome screen, disappointing for a printer of this price. Navigation is done using the arrow buttons on the display. Finding your way through the different menus and settings can be a challenge with this display. Many P1S and P1P owners have voiced their distaste for this display. We advise anyone who purchases the P1S to simply swap over to the Bambu Handy app to control your printer.
The Ender 3 V3 is equipped with the same 4.3” HD touchscreen display found on the Creality K1 series 3D printers. This full-color screen makes navigating the different menus and making adjustments to the printer simple and very user-friendly. The screen also provides visuals for the calibration and heating processes of the printer, which is nice to have. Overall, the user experience of the V3 controls and display features provides everything that the P1S should have shipped with in the first place.
Print Speed
The P1S is marketed with a maximum print speed of 500 mm/s and a maximum print head acceleration of 20,000 mm/s, making it one of the fastest 3D printers at this price point. While these speeds will almost certainly never be obtained during real-world use, you will definitely notice a gap between traditional i3-style 3D printers and the speed of the P1S. These speeds are only possible because of the CoreXY design, minimizing print head weight and removing the need to move the print bed at all until it is time to move on to a new layer. The use of Klipper-based firmware also heavily contributes to these print speeds.
The Ender 3 V3 is marketed with a similar maximum acceleration speed of 20,000 mm/s and a maximum print speed of 600 mm/s, 100 mm/s faster than the P1S. These speeds are achieved through a combination of the CoreXZ design as well as improvements to the machine’s Klipper firmware. The lightweight print head sits at only 600 grams, 300 grams lighter than most i3-style printers and on par with the P1S.
It is important to note that the V3 is still a bedslinger and that, at higher print speeds, the movement of the Y-axis can result in a reduction of print quality if not properly supported. While this is compensated for in the V3’s firmware, it is something that you do not have to worry about with a CoreXY machine, since the print stays stationary.
Assembly
Assembly of the P1S is more akin to unboxing a new appliance, only requiring the removal of some packing foam, zip ties, and three screws that keep the bed lowered during shipping. Plug in the screen, install the included spool holder, power on the printer, and you are good to begin first-time calibrations. The whole assembly process shouldn’t take you more than five minutes and you should be printing your first model in about ten minutes. This is one of the most beginner-friendly printers to set up as little-to-no real assembly is needed.
The Ender 3 V3 will require more assembly than the P1S, though not nearly as much as some other Ender 3 variants. The printer comes flat-packed in two separate pieces. The gantry comes preassembled with your print head and stepper motors already in place. The base of the machine houses your mainboard and power supply as well as the print bed. Only eight screws are needed to connect the gantry to the base. You will need to connect all of the motor and sensor cables as well as connect the print head cable. Install the Bowden tubing from the filament runout sensor to the hot end and attach it to the print head cable to keep it in place. Be sure to also install the strain relief pieces for the print head cable. The spool holder mounts onto the side of the printer by sliding onto two pre-placed screws. Finally, connect the display to the front of the base and power on the machine.
Assembly of the Ender 3 V3 will take about 10-15 minutes. After running first-time calibrations, you should be starting your first print in under 20 minutes. This is a fairly easy printer to assemble, even for a beginner. If you do not want to deal with assembly at all, then the P1S is better suited for you.
AMS Compatibility
The P1S is a Bambu Lab printer and therefore is compatible with their Automatic Material System(AMS) unit, allowing you to use up to 16 different filament types and colors that your printer will automatically swap between during your prints. This is a must-have feature if you plan on printing multi-color prints. It can also be used to swap between different rolls of the same type of filament, ensuring you never run out of filament in the middle of a print.
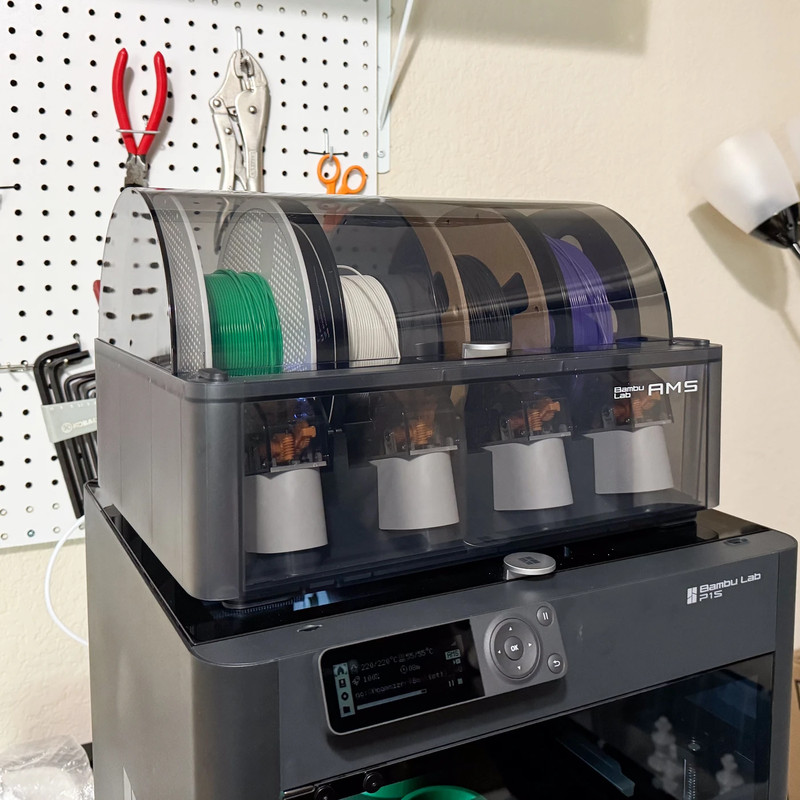
The Ender 3 V3 is not compatible with Bambu Lab’s AMS system, and Creality does not yet have their own multi-color printing solution released. While accessories like the Palette allow you to achieve multi-material printing, the Bambu setup is much more seamless since everything is built in the Bambu ecosystem.
You can purchase the AMS from the Bambu Lab store A discounted bundle containing both the P1S and the AMS is also available.
Should You Buy The Bambu P1S or Ender 3 V3?
The verdict is going to come down to what you need out of your printer. The Ender 3 V3 is almost half the price of the P1S, has a faster print speed, a full-color touchscreen display, and a slightly smaller footprint than the P1S. The P1S comes with an enclosure, an air filter, a built-in camera, a true CoreXY motion system, and a larger build volume than the V3.
If you plan on sticking with hobby-grade filaments such as PLA, PETG, and TPU, want a printer that doesn’t take up too much space, and want a good user experience when operating your printer, the Ender 3 V3 is the clear winner in terms of value. We believe that the majority of beginners will prefer this printer over the P1S as it offers a lot at a much cheaper price point.
If you do plan on printing with engineering-grade filaments such as ABS, ASA, and carbon fiber blends, want a true CoreXY printer, or are interested in multi-material printing then the P1S is for you. It is compatible with the Bambu Lab’s AMS unit for multicolor printing and comes with just about everything you would want out of an enclosed printer, minus the touchscreen.
Both of these printers are among the fastest on the hobby-grade market right now and will provide you with similar print quality. You can’t go wrong with either, so be sure to choose based on the factors listed above.
Click here to view the Bambu Lab P1S on the Bambu Lab website.
Click here to view the Creality Ender 3 V3 on Amazon.
You can find a side-by-side comparison of the specifications for these two printers in the table below: