If you make a purchase using a shopping link on our site, we may earn a commission. Learn More
Ender 3 V3 vs AnkerMake M5C

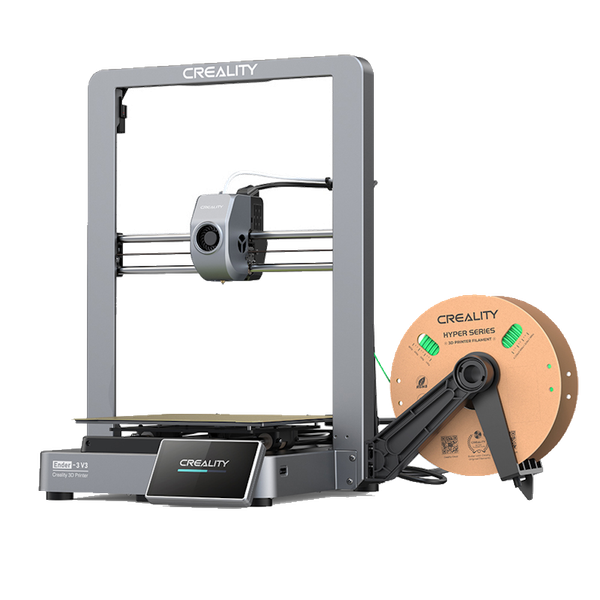
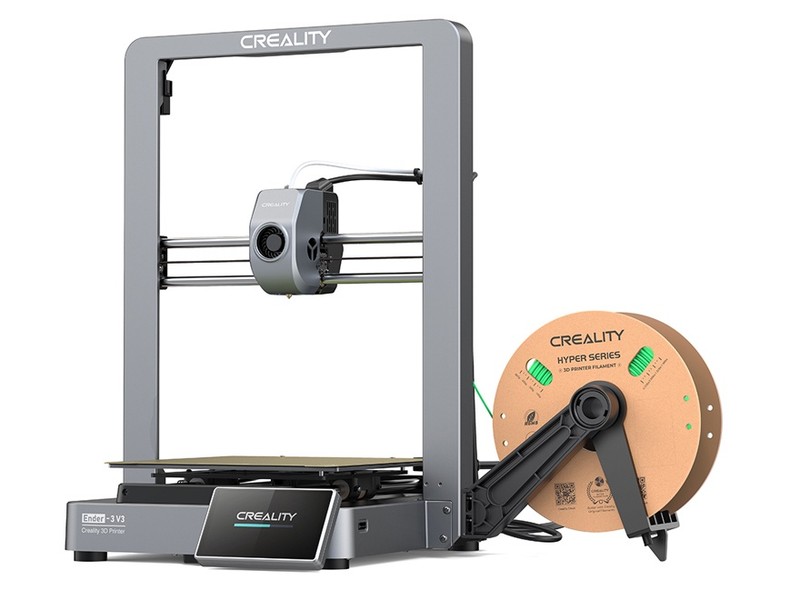
Creality Ender 3 V3
(~8.75 x 8.75 x 10 in)
Vs.
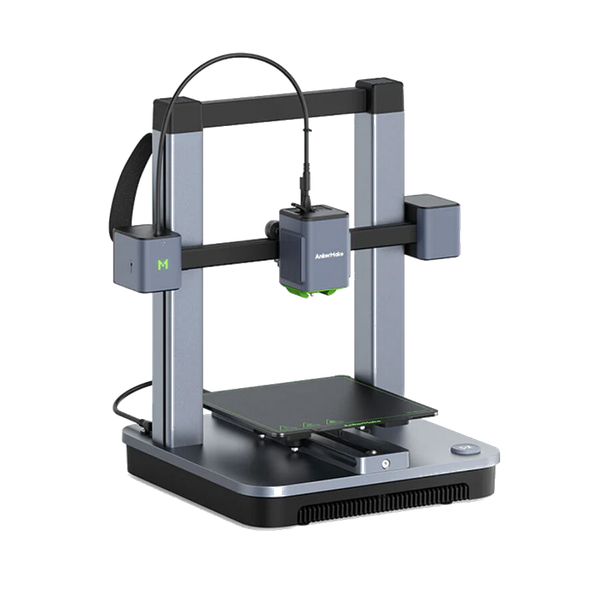
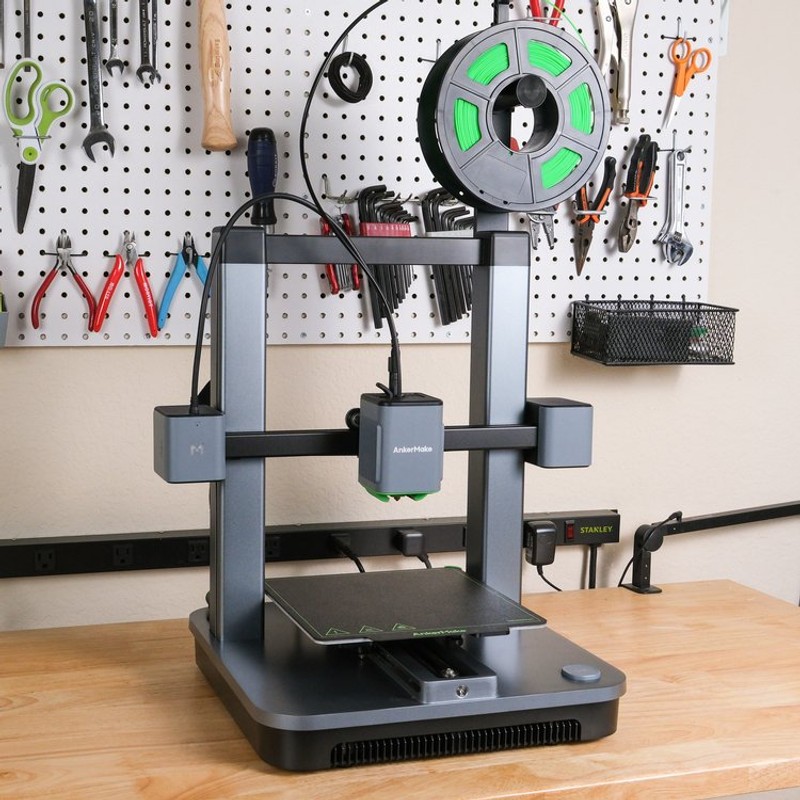
AnkerMake M5C
(~8.75 x 8.75 x 10 in)
AnkerMake has recently made its debut in the 3D printing space with its 2022 release of the AnkerMake M5, a very capable and appealing printer to new users. They have since followed up with the release of the AnkerMake M5C, reducing the price and addressing many of the issues that the community had with the original M5 while also making some unexpected changes, for better or worse.

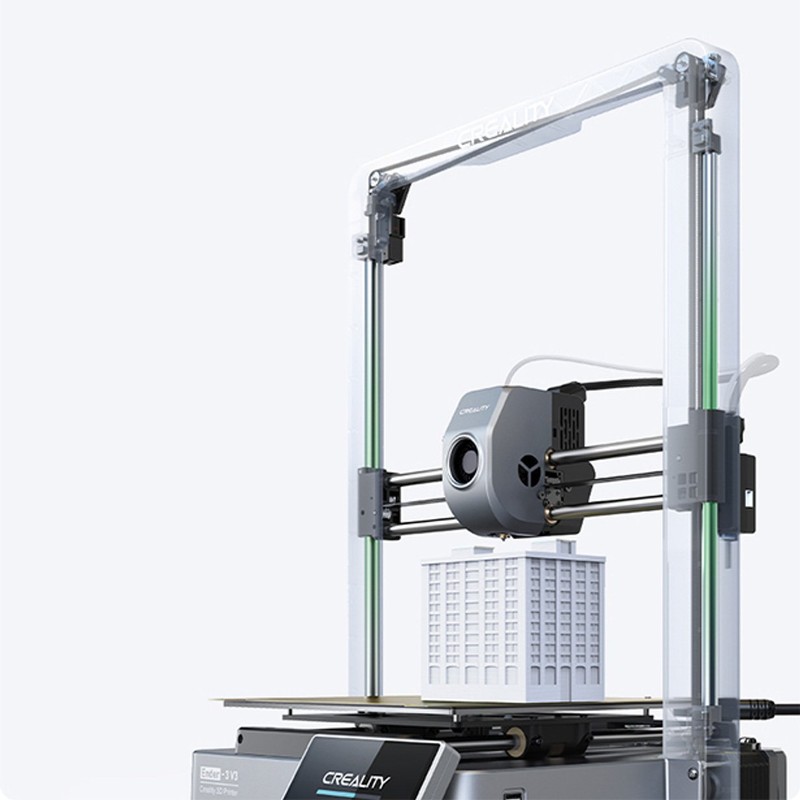
The Ender 3 V3 is Creality’s latest entry into the high-speed 3D printing race. It features a new take on the old motion system, opting for a CoreXZ design that is intended to provide the same speed capabilities as popular CoreXY machines in the Cartesian form factor. This novel design choice has led to some improved performance though we don’t see much of it in the areas that we would like.

Similarities Between the Ender 3 V3 and AnkerMake M5C
From appearances to specs, there are a lot of similarities between these two machines.
Build Quality
The Ender 3 V3 is built from a two-part frame, with the gantry and base attaching together with eight screws. Both parts are made from die-cast aluminum, giving them a rigid feel and sleek appearance. This is becoming standard for higher-speed 3D printers, as they very much need the additional rigidity. While the V3 still maintains the classic Ender 3 appearance, it is very apparent that this machine is built with durability in mind.
The AnkerMake M5C is also made from a two-part die-cast aluminum frame, with the gantry and base being the only parts of the machine. The AnkerMake M5C looks and feels more appliance-like than the V3, carefully hiding any screws or wires out of sight. The frame is sturdy and better suited for high-speed printing than the original M5 design. Even the motion system is carefully placed out of sight when viewing the machine from the front. The gantry is also enclosed, keeping the lead screws and wiring safe from dust and debris.
Both of these machines are built using modern methods that provide excellent build quality.

Build Volume
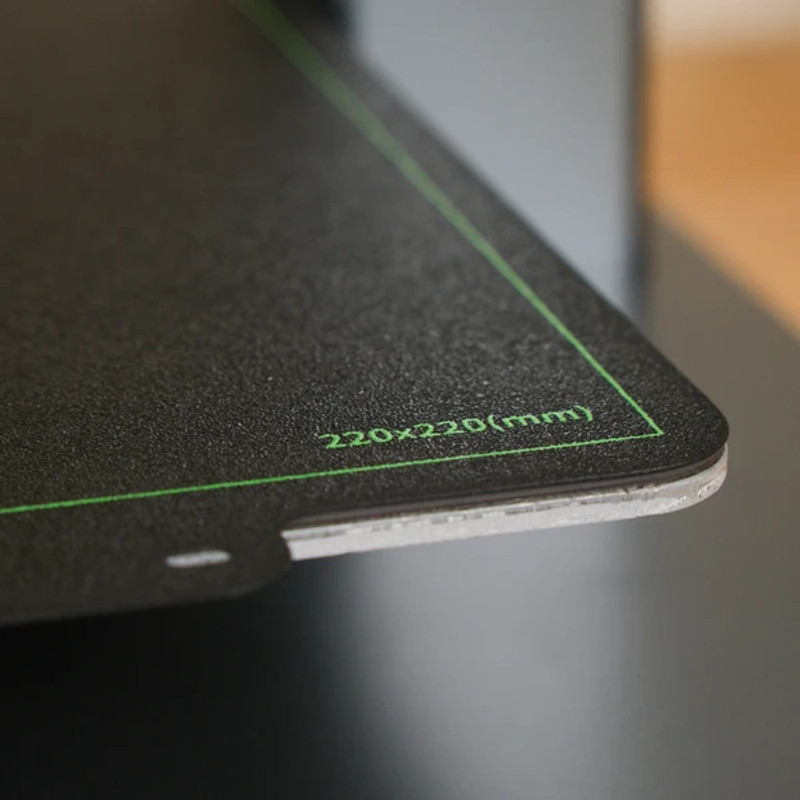
Both the Ender 3 V3 and the AnkerMaker M5C use a standard build volume of 220 x 220 x 250 mm. This is the same size of build volume that you can find on many Ender 3 machines and Ender 3 clones. It is suitable for the majority of prints, though you may find the bed a tad too small to fit larger projects or multiple objects onto the bed in a single print.

Extruder and Hotend
Both the Ender 3 V3 and the AnkerMake M5C are equipped with all-metal high-flow hot ends that are capable of heating up to 300°C, making them suitable for printing many engineering-grade filaments such as carbon fiber blends and polycarbonates. You will have no issues printing the more generic filament types such as PLA, PETG, TPU, and ABS as well.
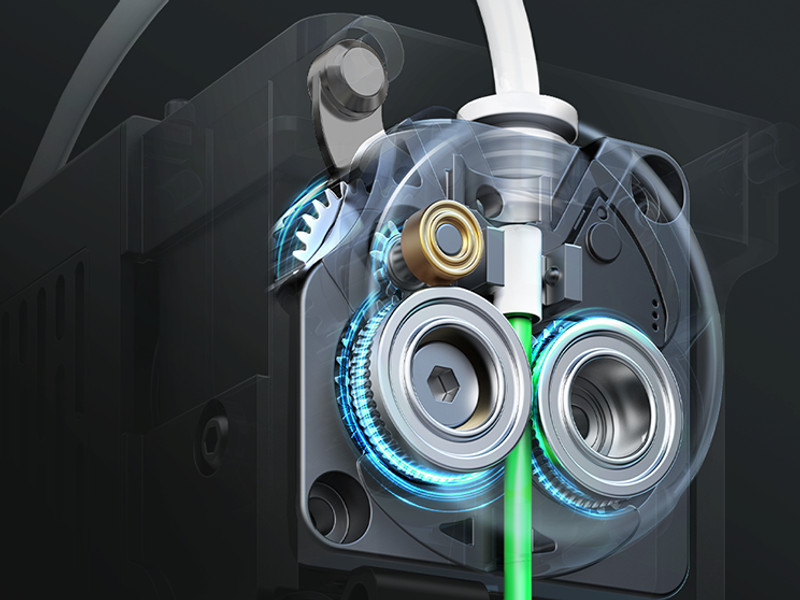
Both machines come with a dual-gear direct drive extruder that grips the filament from both sides for consistent material feeding. A Bowden tube is used to guide the filament to the extruder. We prefer direct drive extruders over Bowden-style extruders as they are easy to maintain and are much more capable when printing with flexible filaments such as TPU.
Auto Leveling
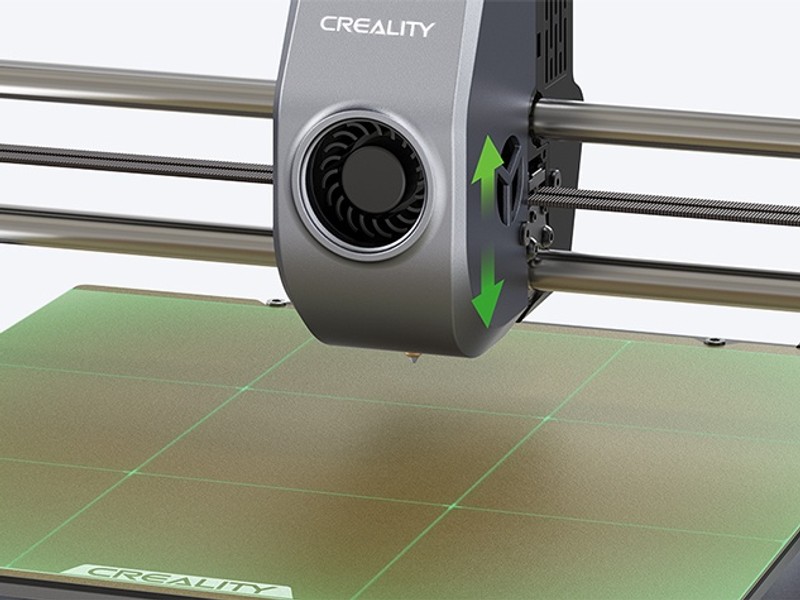
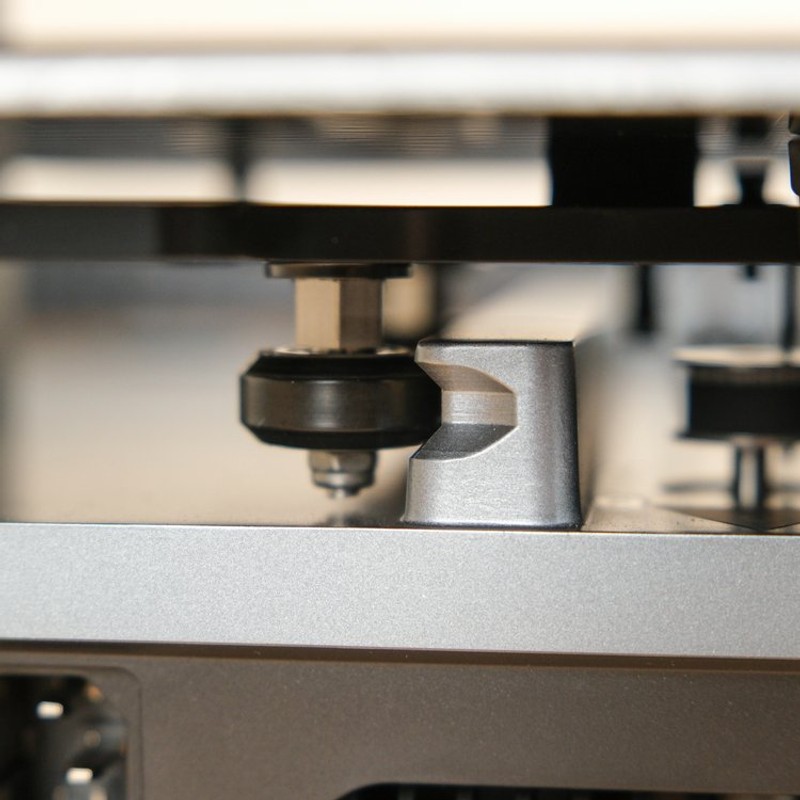
Both the Ender 3 V3 and the AnkerMake M5C use a combination of strain gauges and load cell sensors to automatically level the bed and create a bed mesh that compensates for any uneven printing surfaces. This is becoming expected for 3D printers at this price point and we are happy to see that there are no disappointments here.
Automatic bed leveling and automatic Z-offset are two very important things for a new 3D printer owner, making the experience much less frustrating when trying to troubleshoot print failures. These settings will give you a perfect first layer for each of your prints, assuming the sensors are calibrated properly.
Print Surface
Both the Ender 3 V3 and the AnkerMake M5C use textured PEI print surfaces. We have found the textured PEI sheets provide excellent bed print adhesion and allow for easy part removal once the bed cools back down after printing. This print surface has become our standard and we are happy to find it stock on both of these machines. Both print surfaces are flexible which makes part removal much easier, removing the need for a scraper or spatula and extending the service life of each print surface. Regular cleaning is recommended to keep dust and oils from building up on the bed and causing poor adhesion. Isopropyl alcohol and some paper towels will do.
You can find additional or replacement print surfaces on both the Creality store and the AnkerMake website.
Assembly
Unlike previous generation 3D printers, both the Ender 3 V3 and the AnkerMake M5C look to make the new user experience as beginner-friendly as possible with a very simple assembly process.
Assembly of the Ender 3 V3 only requires attaching the gantry to the base with the included screws. After ensuring that all of the motor plugs and sensors are correctly connected, plug in the screen and slide the filament holder into place. The whole process should only take about 10-15 minutes from unboxing to starting your first print.
The AnkerMake M5C takes ease of assembly a step further than even the V3, with all of the motors and sensor plugs pre-installed. After attaching the gantry to the base, there is a single cable that connects from the gantry to the backside of the base. This is the only cable that you will have to plug in manually. Attach the spool holder to the top of the machine and you are ready to begin startup calibrations. From unboxing to first print, you can expect to take less than 10 minutes with the M5C.
Connectivity
Both of these machines use WiFi functionality for modern control and monitoring of your prints.
The Ender 3 V3 connects to your local WiFi network upon initial startup. This allows you to use the Creality Cloud app to wirelessly send prints to the machine. The AnkerMake M5C uses the AnkerMake app to control the 3D printer, giving you readouts on temperatures, and print status, and allowing you to send prints directly to the printer over your local network. The AnkerMake app offers more functionality than the Creality Cloud app, such as automatic file slicing, which makes it better suited for beginners though both applications achieve the same results as far as connectivity goes.
The Ender 3 V3 is capable of printing offline using the included USB thumb drive, which is much nicer to use than SD cards from older generation 3D printers.
The AnkerMake M5C has a port for a USB type-C thumb drive to connect to the printer and allow offline printing, though this drive is not included with the 3D printer. Type-C thumb drives are not as common and will be an added expense should you want to store your prints for offline use.
Differences Between the Ender 3 V3 and AnkerMake M5C
As similar as these machines are, there are some big differences that may sway your opinion as to which of these printers is right for you.
Motion System
The biggest difference, and the most obvious, between these two machines is the different types of motion systems used.
The Ender 3 V3 uses a very unique CoreXZ design that pairs the X-axis and the Z-axis together, both being controlled by two high-torque stepper motors on the base of the machine. This design makes for a lighter gantry than most 3D printers and allows for faster movements in the Z-axis, though we do not see this as a necessary improvement as Z-axis speed is not a concern for most users. The only real improvement the CoreXZ design provides comes with the paired linear rods for the Z-axis, replacing the typical lead screws and providing a more rigid movement system that will lead to reduced Z-banding and more precise Z movements.
The lighter print head, along with the use of linear rods for the X and Y axes, allows this machine to reach high speeds with reduced vibrations. This leads to improved print quality at higher speeds. We prefer the use of linear rods, especially on high-speed machines, as they have been proven to be one of the most durable motion systems for 3D printers.
The motion system of the AnkerMake M5C is where you will find out how AnkerMake was able to reduce the cost of this machine. The M5C uses the same V-wheel rollers and aluminum V-slot extrusions found on older generations of 3D printers. While perfectly capable, V-wheels are proven to deteriorate over time and can lead to deformities in prints if they are not maintained properly. With a high-speed printer such as the M5C, you can expect these parts to deteriorate even faster. These V-wheels are used for both the X and Y axes. We would have liked to see the inclusion of linear rods or rails for a printer at this price point. You can expect similar performance from this motion system early on, though, in the long run, more robust parts will win out.
Display and Controls
Another major difference you will find between these two printers is in the controls or lack thereof.
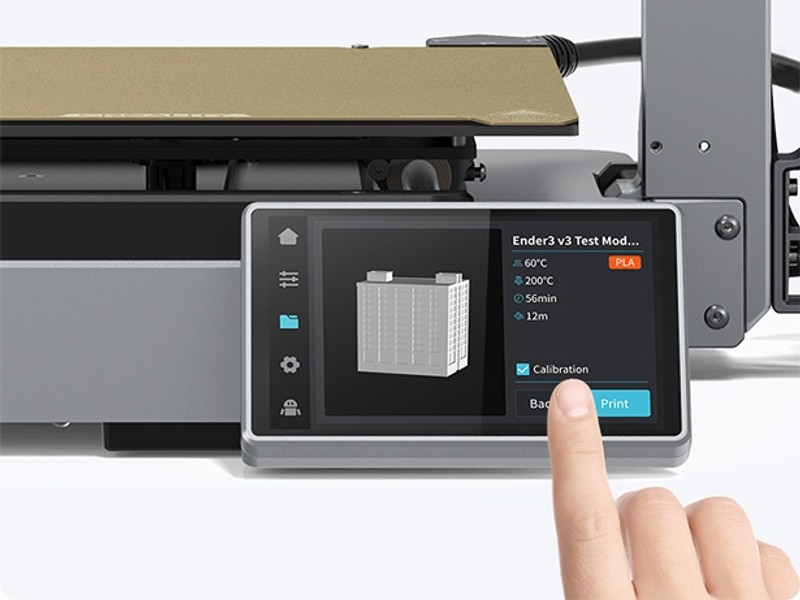
The Ender 3 V3 comes with a 4.3” HD full-color display that mounts to the front base of the machine. The touchscreen display is easy to navigate, with all of the settings and functions where you would expect them. This is a nice screen, even when compared to other printers at this price point.
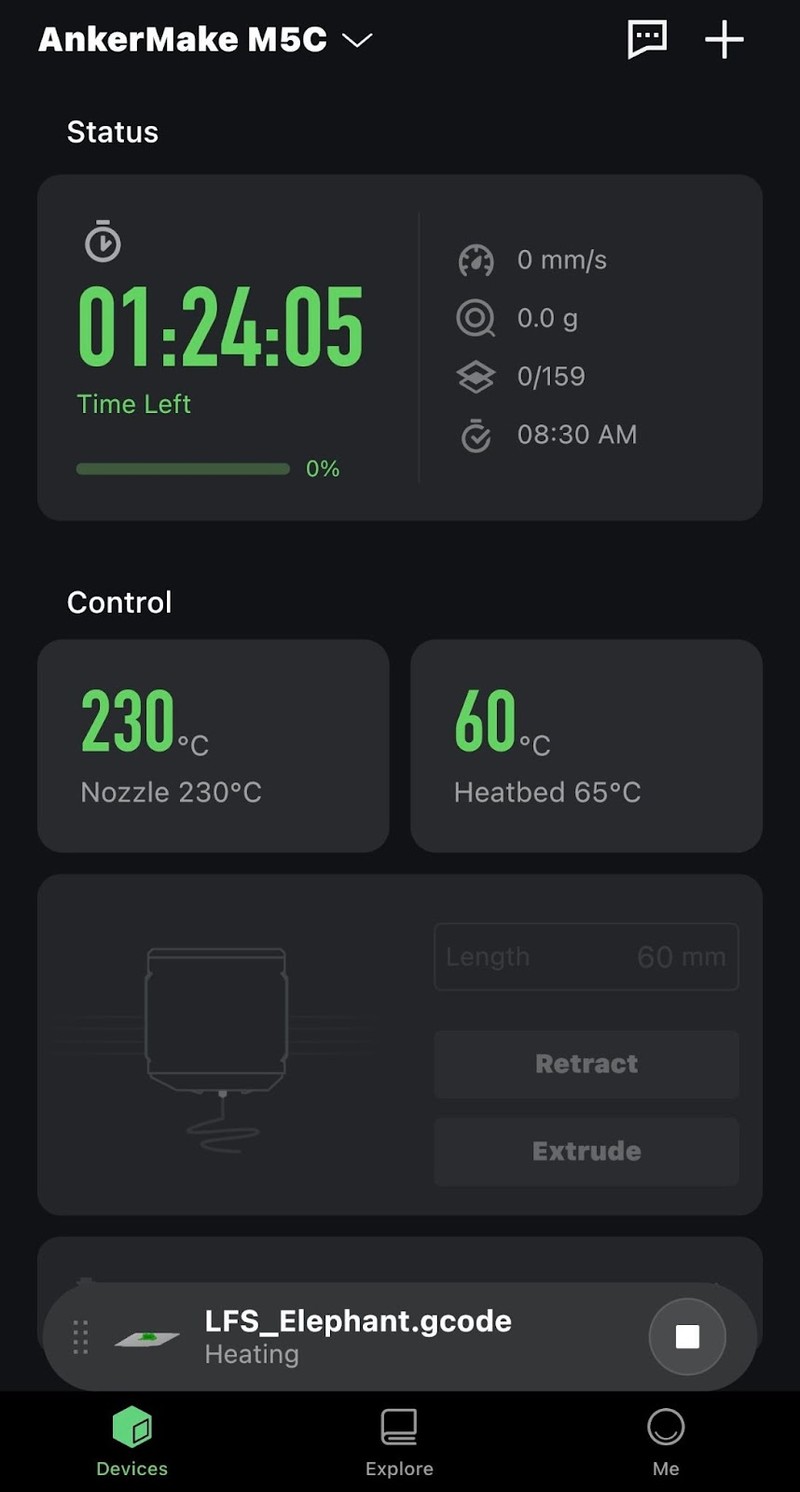
The AnkerMake M5C takes a very different approach, completely removing any sort of screen from the machine. The AnkerMake app is the only way to fully control the M5C, making your phone the actual screen. While not standard for any type of 3D printer, this does play into the appliance-like nature of this machine and could be seen as a positive for those who are new to 3D printing. The AnkerMake app itself is very easy to navigate and is one of the better 3D printing apps that we have used. For those wanting a completely offline experience with their printer, this is obviously a major downside. We would have loved to see even a simple screen shipped with the M5C.
The only sort of control found on the printer itself is a single button on the base of the machine. The button has three different functions. Single-tap the button to print the latest file on the USB drive. Double tap to reprint the most recent file printed. Holding down the button for three seconds will initiate homing. These are the default settings and can be swapped around however you wish using the AnkerMake app.
Physical Size
While similar in shape and appearance, the Edner 3 V3 is slightly smaller in size when compared to the AnkerMake M5C. The V3 comes in at 358 x 374 x 498 mm in size, with the M5C sitting at 466 x 374 x 732 mm in total size. The M5C measurements include the spool holder, which is mounted to the top of the machine and takes up additional space. The V3 has slots for the spool holder on the top and side of the machine, making it much easier to move around and make space on your desk for it. If you already have your filament spool situation figured out and just want the smallest form factor 3D printer between the two, the Ender 3 V3 is the right choice, though not by much.
Print Speed
The Ender 3 V3 is marketed with a maximum print speed of 600 mm/s, rivaling many of the fastest CoreXY 3D printers available today. This is an impressive speed for a bedslinger and, while unrealistic for optimal print quality, the high speed capability will result in faster print times than most bedslingers on the market. Creality claims this is due to the Core XZ design, though the use of linear rods and spring-mounted bearings for the motion system is what we have found to make the biggest impact on print speed.
For the best results, most users will be printing at around 300 mm/s, which is still respectable for this type of printer.
The AnkerMake M5C is listed to have a maximum print speed of 500 mm/s. While not quite the 600 mm/s of the V3, you can expect similar print times from these two machines, with the V3 finishing slightly faster, of course. Realistic print speeds from the M5C are around 250 mm/s for optimal print quality on your prints.
If you intend on printing a lot of simple parts and want them fast, the Ender 3 V3 will get the job done faster than the M5C. This is especially true when printing multiple objects at the same time, as the increased acceleration of the V3 will make movement between parts faster than the M5C. For the average user or a beginner getting their first 3D printer, the difference in speed between these printers will be close to trivial.
Firmware
The Ender 3 V3 uses Creality OS, Creality’s own iteration on Klipper. Like Klipper, it is an open-source firmware that allows users to make any changes they want or implement features they find interesting for their own V3. This makes the V3 very appealing to users who are experienced with Klipper and want to customize the features of their 3D printer.
The AnkerMake M5C uses AnkerMake’s own in-house version of Klipper firmware, though it is not open-source. Making any changes to this firmware to implement custom features will be a chore for the average user and nearly impossible for a beginner.
Both of these machines use Input Shaping and Linear Advance to improve the quality of prints at higher speeds. Those looking for their first 3D printer will not be able to tell the differences between the firmware on these machines.
Should You Buy the Ender 3 V3 or the AnkerMake M5C?
We believe that the majority of users will prefer the Ender 3 V3 over the AnkerMake M5C. For an extra $100, you are getting a more robust motion system, with parts that are known for their durability, a faster print speed, open-source firmware, and a display that you can use to operate your printer without requiring WiFi.
For users who are looking to purchase their very first 3D printer, we think that there is a good argument to be made for the AnkerMake M5C. It is easier to assemble and hides most of its components behind an appealing frame. The appliance-like nature of this printer and the ability to fully operate the machine from your smartphone may feel more natural for those new to the hobby. The AnkerMake app is being designed with new users in mind, giving them the ability to start printing without ever having to learn how to use slicing software.
We think that if you are not sure if 3D printing is for you and want to test the hobby with a decent entry-level machine with a low barrier to entry, the AnkerMake M5C is a good choice to get you started.
Click here to view the Creality Ender 3 V3 on Amazon.
Click here to view the AnkerMake M5C.
You can find a side-by-side comparison of the specifications for these two printers in the table below: